
Snowflake Python UDF AutoML Predictions with Amazon AutoGluon
Custom Python Dependencies on Snowflake with Python Snowpark
Author: Josh Patterson
Date: February 15th 2023
Introduction and Overview

In some of our previous posts we showed the reader how to deploy machine learning models in different ways:
- Saving the Model Local to the Application
- Packaging the Model as Part of the Snowflake UDF Code
- Building Custom Model Servers on Kubernetes with KFServing
In this post we’ll take a look at deploying an AutoGluon AutoML model on Snowflake as part of a Python UDF that requires custom Python dependencies not available as part of the provided Anaconda Snowflake repository.
We’ll explain how to import a “wheel” file that has been downloaded from PyPi and use it as a dependency in a Python UDF on Snowflake.
Goals of Exercise
In this post we’ll show two main points:
- how to load external python dependencies for Snowpark Python UDFs (pip packages, but are not part of Snowflake’s Anaconda channel)
- how to get AutoGluon working with Snowpark Python UDFs
With that in mind, let’s dig into how to load external python dependenices and make them available to our Python UDF on Snowflake.
Part 1: Loading External Python Dependencies for Snowpark Python UDFs
The general process for planning and deploying external python dependencies for Python UDFs on Snowflake is:
- determine which dependencies you need for the Python UDF on Snowflake
- Check whether the required package is available in anaconda repository or not
- download the .whl files for the dependencies you need from Pypi
A WHL file is defined as:
A WHL (Wheel) file is a distribution package file saved in Python’s wheel format. It is a standard format installation of Python distributions and contains all the files and metadata required for installation. The WHL file also contains information about the Python versions and platforms supported by this wheel file. Similar to an MSI setup file, WHL file format is a ready-to-install format that allows running the installation package without building the source distribution.
Once we have the .whl files locally, we can import these into Snowflake with the following steps:
- create a stage to hold the .whl files on Snowflake
- upload each .whl file to the stage you created (e.g., via a SQL PUT command, or using the Session object in the Snowpark Python API)
- upload a python script (
snowflake_whl_loader.py) to unzip and add dependency .whl files to the Snowflake instance’s path variable - write the Python UDF and reference the python script (
snowflake_whl_loader.py) to allow your code to use the dependencies
The caveat is that this should work under the following conditions:
- the python package is platform-independant
- the python package doesn’t require OS-native libraries or specific CPU architectures
Let’s look at some details on the steps below.
Collect Dependency WHL Files
After you’ve determined which dependencies you need for your UDF, check to see if Snowflake already has the dependency in the built-in Anaconda repo:
https://repo.anaconda.com/pkgs/snowflake/
If you don’t see your dependency in that list, then head over to https://pypi.org/ to download the .whl files for each dependency you need.
Note: you may end up having to track down several extra dependencies that aren’t obvious at first.
Use Snowpark Python API Session to Upload Files
Once you have the .whl files you need downloaded locally, now you need to upload the files to a stage (e.g., “@AUTOGLUON_PACKAGES”) on Snowflake. You can do this easily from a python jupyter notebook (with Snowpark python dependencies) with the Session.File class as seen in the example below:
session.file.put( './install/autogluon_whl_files/autogluon-0.6.2-py3-none-any.whl', "@AUTOGLUON_PACKAGES",overwrite=True, auto_compress=False )Once we have the external dependency .whl files in a Snowflake stage, we can start building our Python UDF.
Upload Our WHL File Loader
We also need to upload our python script to install the WHL files from the Snowflake stage remotely. You can see an example of this below where we again use the Session.File class to upload the file to the stage.
session.file.put( './install/snowpark_whl_loader.py', "@AUTOGLUON_PACKAGES",overwrite=True, auto_compress=False )The snowpark_whl_loader.py script uses the approach described in Snowflake’s documentation. In this design pattern the script extracts the contents of a zip file in a stage to the system path. Finally the directory that is extracted from the zip file is added to the system path. The code section below shows the core of our whl file loader:
class FileLock:
   def __enter__(self):
      self._lock = threading.Lock()
      self._lock.acquire()
      self._fd = open('/tmp/lockfile.LOCK', 'w+')
      fcntl.lockf(self._fd, fcntl.LOCK_EX)

   def __exit__(self, type, value, traceback):
      self._fd.close()
      self._lock.release()

import sys,os,threading,fcntl,zipfile
IMPORT_DIRECTORY_NAME = "snowflake_import_directory"
import_dir = sys._xoptions[IMPORT_DIRECTORY_NAME]

def load(file_name):
    path=import_dir + file_name
    extracted='/tmp/' + file_name
    with FileLock():
        if not os.path.isdir(extracted):
            with zipfile.ZipFile(path, 'r') as myzip:
                myzip.extractall(extracted)
                myzip.printdir()
    sys.path.append(extracted)
Later in this blog post we’ll show a few extra helper methods in the loader file that are specific to our AutoGluon loading goals.
Next, let’s install our UDF on Snowflake.
Install UDF with External Dependencies
Using the Snowpark Python API we can build and install a Python UDF from a Jupyter notebook.
The things we need to do to create and install this Python UDF on Snowflake is to import any files in stages that we may need in our Python UDF Code. In this case we need:
- any WHL files we need as dependencies
- any python scripts we need, such as the WHL file loading script
- the list of packages our UDF code needs to use that are already in the Anaconda repository available inside Snowflake
Our UDF code might look like:
...
session.add_import( '@AUTOGLUON_PACKAGES/autogluon.features-0.6.2-py3-none-any.whl' )

session.add_import( '@AUTOGLUON_PACKAGES/snowpark_whl_loader.py')

pkgs_list = ['xgboost', 'pandas', 'requests', 'tqdm', 'psutil', 'boto3', 'joblib','scikit-learn', 'networkx', 'setuptools']

@udf(name='test_autogluon_fn',session=session,packages=pkgs_list,replace=True,is_permanent=True,stage_location='@autogluon_expense_forecast_udfs')
def test_autogluon_fn(input_variable_list: list) -> float:
    import sys, os
...
As we can see in the code snippet above, we are adding both some WHL files and then the snowpark_whl_loader.py script we created with the session.add_import() method.
Once we have the stage files imported to our session, they are available locally to the snowflake instance python code. However, for the WHL files, we need to unpack them and add them to the system path.
Install Dependencies on Remote Snowflake Instance Manually
Once we have the depenency WHL files and the loader script imported into our UDF Python code, we can now install the dependencies with the loader script.
The code listing below shows all of the lines of our install script snowpark_whl_loader.py:
class FileLock:
   def __enter__(self):
      self._lock = threading.Lock()
      self._lock.acquire()
      self._fd = open('/tmp/lockfile.LOCK', 'w+')
      fcntl.lockf(self._fd, fcntl.LOCK_EX)

   def __exit__(self, type, value, traceback):
      self._fd.close()
      self._lock.release()

import sys,os,threading,fcntl,zipfile
IMPORT_DIRECTORY_NAME = "snowflake_import_directory"
import_dir = sys._xoptions[IMPORT_DIRECTORY_NAME]

def load(file_name):
    path=import_dir + file_name
    extracted='/tmp/' + file_name
    with FileLock():
        if not os.path.isdir(extracted):
            with zipfile.ZipFile(path, 'r') as myzip:
                myzip.extractall(extracted)
                myzip.printdir()
    sys.path.append(extracted)


def install_autogluon():

    load( "autogluon-0.6.2-py3-none-any.whl" )
    load( "autogluon.tabular-0.6.2-py3-none-any.whl" )
    load( "autogluon.common-0.6.2-py3-none-any.whl" )
    load( "autogluon.core-0.6.2-py3-none-any.whl" )
    load( "autogluon.features-0.6.2-py3-none-any.whl" )
When our UDF code gets to the following line, the whl dependeny files will be installed:
snowpark_whl_loader.install_autogluon()(Note: We have to upload the dependencies listed in the install_autogluon() method, but we’ll do that a little later int his article.)
Once the above line executes inside the body of the Python UDF code, you can then reference the code via imports from WHL files after that point in the UDF.
Now, let’s see all of this in action when we pull in AutoGluon into Snowflake to be used in a UDF with a model saved in a stage.
Part 2: AutoML Predictions in Snowpark Python UDFs on Snowflake with AutoGluon
With the above method in mind, we can now look at how to get AutoML and AutoGluon working with Snowpark UDFs
Steps:
- Train an AutoGluon model
- Save the model locally, zip up the contents of the model directory
- Save the zipped model to a Snowflake stage
- Install AutoGluon dependencies manually as whl files on Snowflake
- Reference AutoGluon dependencies from Snowpark Python UDF Code
We’ll start out by showing how to train a basic AutoGluon AutoML model.
Training the AutoGluon Model
In this example we’re going to only use the models in AutoGluon that are in Scikit-Learn so we don’t have to install extra dependencies beyond AutoGluon dependencies.
To restrict the models included in an AutoGluon training run, we need to set the hyperparameters parameter for the .fit() method on the TabularPredictor class:
predictor = TabularPredictor(label=label, path="autogluon_model_insurance_expense").fit(ag_td_X_train, hyperparameters={'RF':{}, 'XT':{}, 'KNN':{}})
This will produce a local directory on your machine that will contain the serialized version of all of the sub-models that represent the results of the AutoML training process. We can use this directory to instantiate a copy of the model and produce inferences from the model on new data.
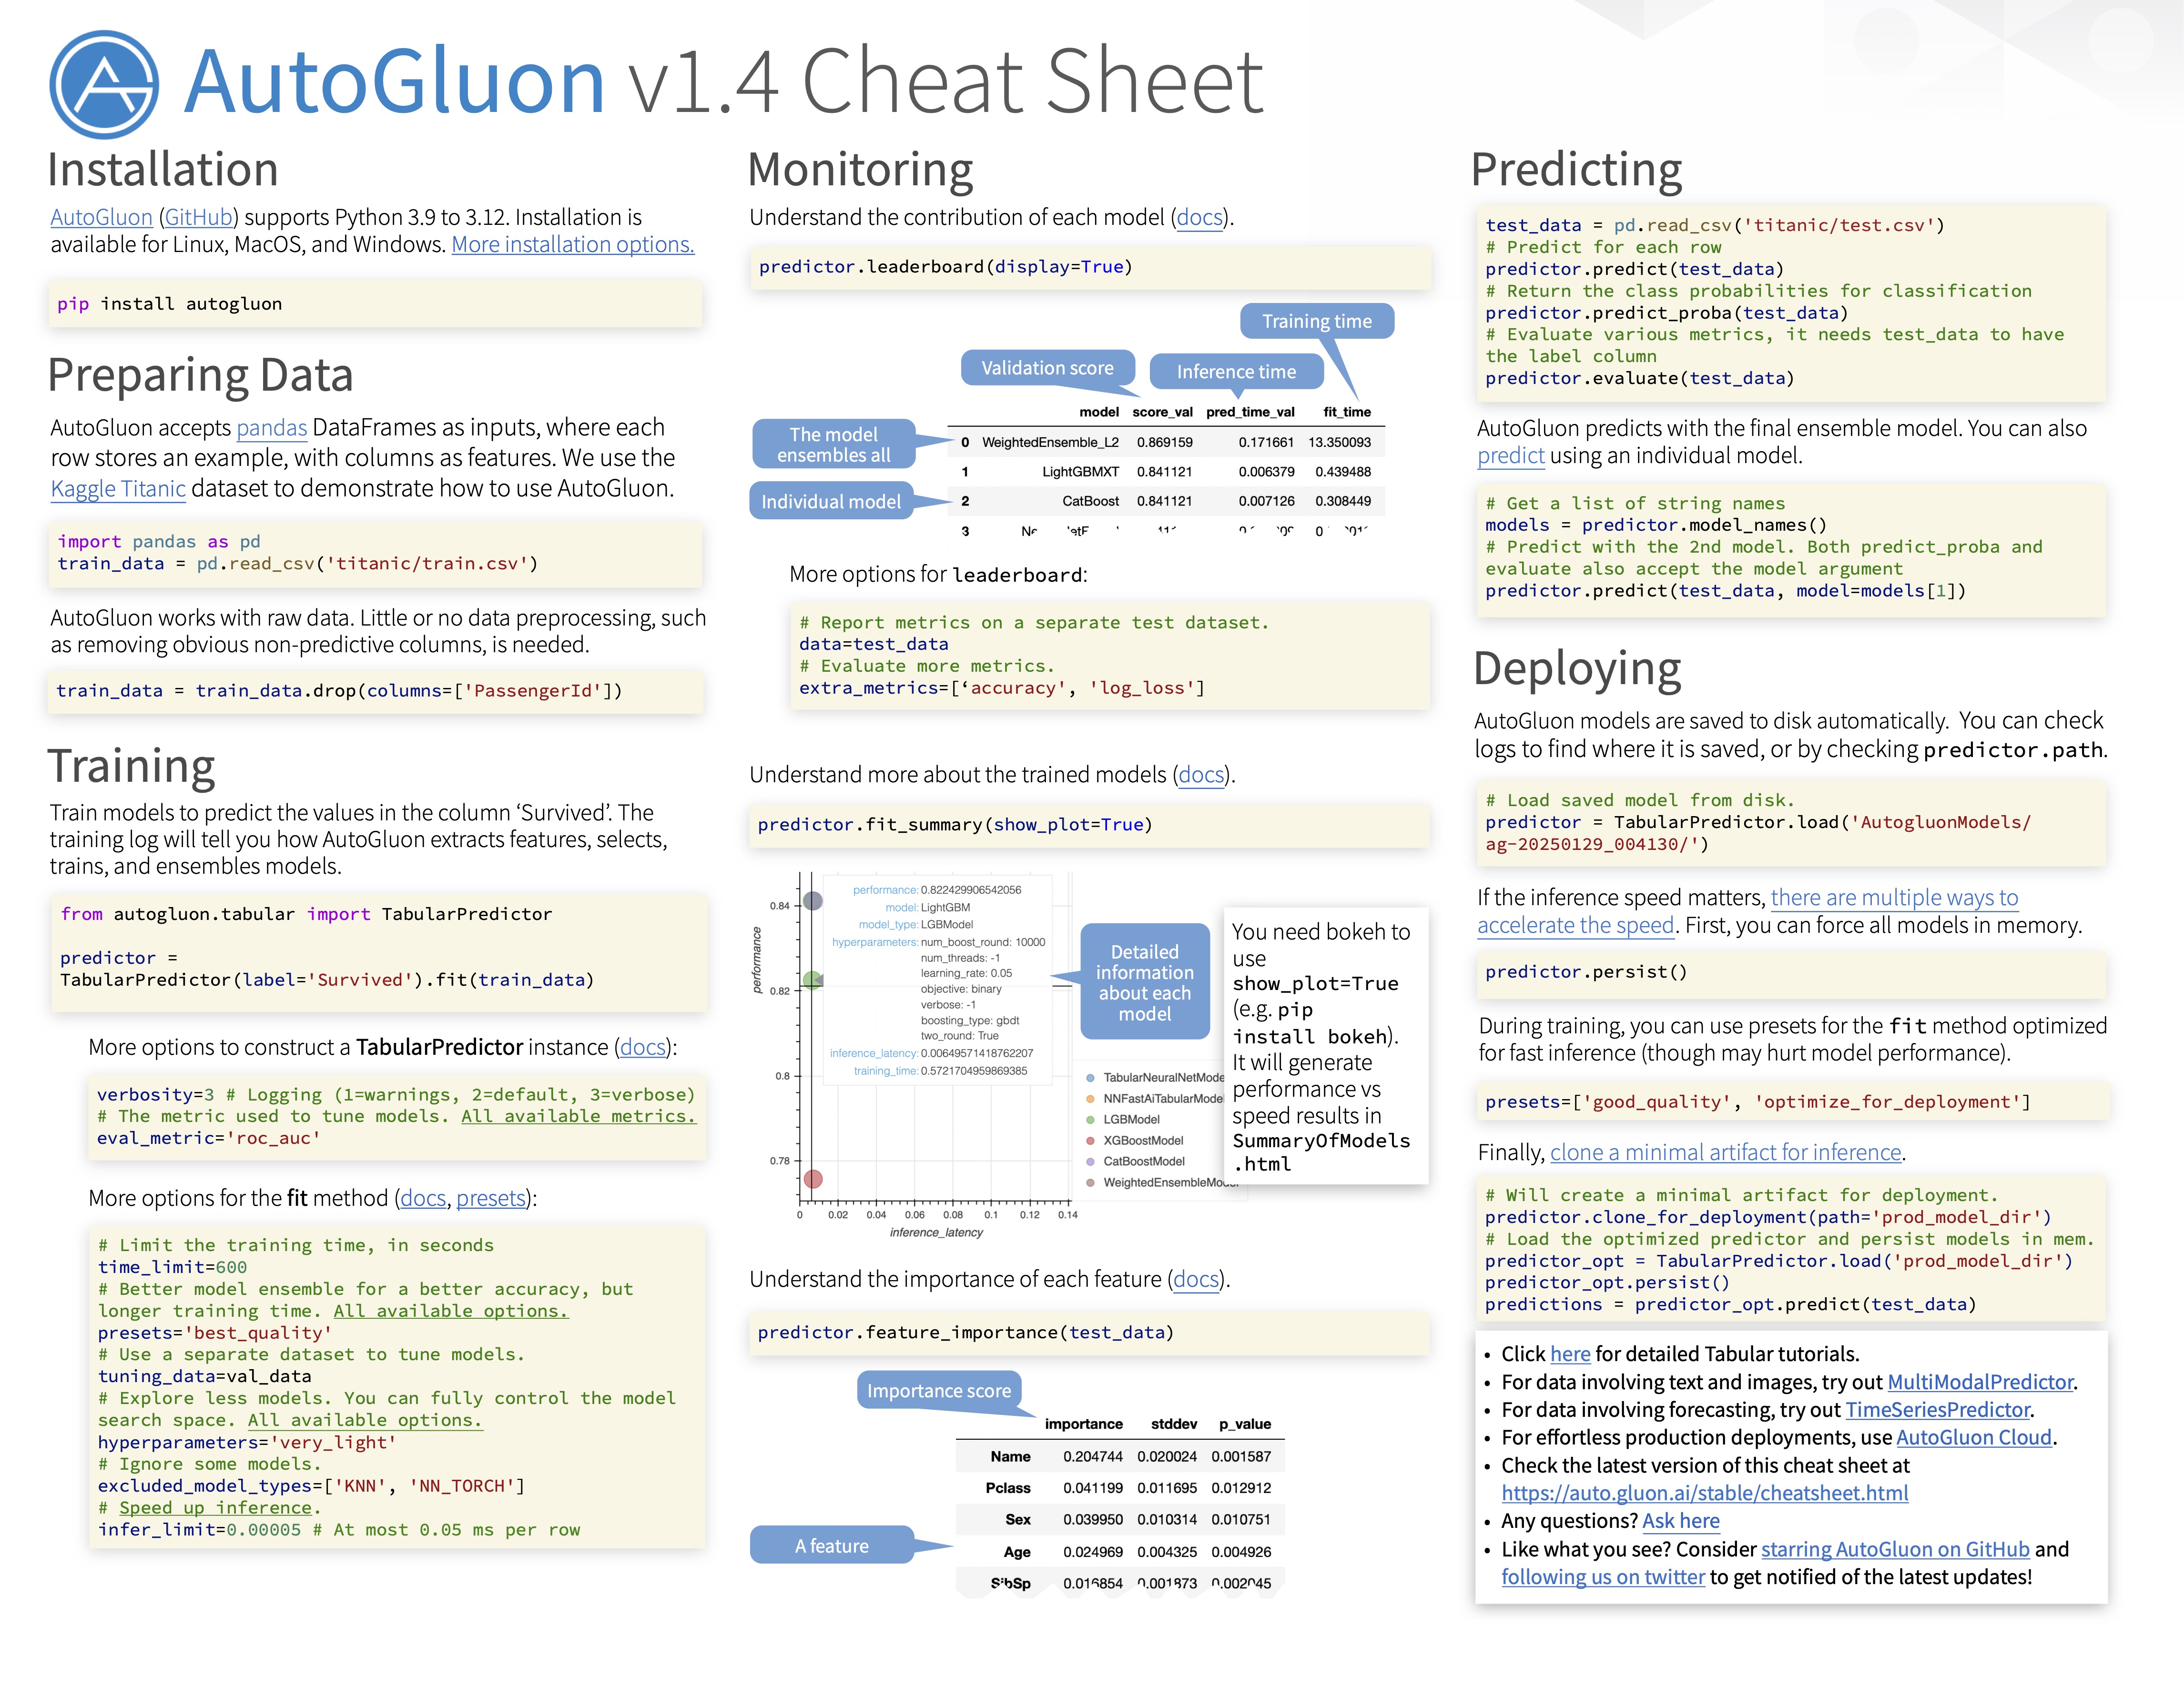
For a quick reference on how to use AutoGluon, check out the AutoGluon website or Cheatsheet.
For quick reference, this is the list of AutoGluon models it uses in the AutoML process and their implementation:
- ‘NN’ (neural network)
- FastAI (Python Based)
- ‘GBM’ (lightGBM boosted trees)
- Python-based
- ‘CAT’ (CatBoost boosted trees)
- C-Based
- ‘RF’ (random forest)
- scikit-learn
- ‘XT’ (extremely randomized trees),
- scikit-learn
- ‘KNN’ (k-nearest neighbors),
- scikit-learn
- ‘LR’ (linear regression)
- scikit-learn
Let’s next take the model directory and zip it up to transport it over to a Snowflake stage for use in our Python UDF.
Save and Zip the Model
You can use the helper function below to build a quick zip file from the local model directory produced by AutoGluon.
import zipfile

def zipdir(path, ziph):
    # ziph is zipfile handle
    for root, dirs, files in os.walk(path):
        for file in files:
            ziph.write(os.path.join(root, file),
                       os.path.relpath(os.path.join(root, file),
                                       os.path.join(path, '..')))
            print(os.path.join(root, file),
                       os.path.relpath(os.path.join(root, file),
                                       os.path.join(path, '..')))
Once we have the model as a zip file, we can upload it to a Snowflake stage.
Save Our Files to Snowflake Stage
You can use SQL PUT commands or the Snowpark Python API, as seen below, to upload files to Snowflake stages.
We save our model zip file to a stage with the Snowpark Python API as shown below.
session.file.put( 'autogluon_model_insurance_expense.zip', "@AUTOGLUON_PACKAGES",overwrite=True, auto_compress=False )Once we have the model zip file on the stage, we can use the same method to upload all of the WHL files we need to run AutoGluon on a Snowflake machine instance in python:
session.file.put( './install/autogluon_whl_files/autogluon-0.6.2-py3-none-any.whl', "@AUTOGLUON_PACKAGES",overwrite=True, auto_compress=False )
session.file.put( './install/autogluon_whl_files/autogluon.tabular-0.6.2-py3-none-any.whl', "@AUTOGLUON_PACKAGES",overwrite=True, auto_compress=False )
session.file.put( './install/autogluon_whl_files/autogluon.common-0.6.2-py3-none-any.whl', "@AUTOGLUON_PACKAGES",overwrite=True, auto_compress=False )
session.file.put( './install/autogluon_whl_files/autogluon.core-0.6.2-py3-none-any.whl', "@AUTOGLUON_PACKAGES",overwrite=True, auto_compress=False )
session.file.put( './install/autogluon_whl_files/autogluon.features-0.6.2-py3-none-any.whl', "@AUTOGLUON_PACKAGES",overwrite=True, auto_compress=False )
Finally, we need to upload the dependency loader python script:
session.file.put( './install/snowpark_whl_loader.py', "@AUTOGLUON_PACKAGES",overwrite=True, auto_compress=False )Now we can build a Python UDF for AutoGluon predictions.
Wire up the Snowpark Python UDF Code to AutoGluon
The partial code listing below shows what a cell in your Snowpark Jupyter notebook might will look like:
session.clear_imports()
session.clear_packages()

# Add trained model as dependency
session.add_import( '@AUTOGLUON_PACKAGES/autogluon_model_insurance_expense.zip')

session.add_import( '@AUTOGLUON_PACKAGES/autogluon-0.6.2-py3-none-any.whl' )
session.add_import( '@AUTOGLUON_PACKAGES/autogluon.tabular-0.6.2-py3-none-any.whl' )
session.add_import( '@AUTOGLUON_PACKAGES/autogluon.common-0.6.2-py3-none-any.whl' )
session.add_import( '@AUTOGLUON_PACKAGES/autogluon.core-0.6.2-py3-none-any.whl' )
session.add_import( '@AUTOGLUON_PACKAGES/autogluon.features-0.6.2-py3-none-any.whl' )

session.add_import( '@AUTOGLUON_PACKAGES/snowpark_whl_loader.py')

pkgs_list = ['xgboost', 'pandas', 'requests', 'tqdm', 'psutil', 'boto3', 'joblib','scikit-learn', 'networkx', 'setuptools']

@udf(name='test_autogluon_fn',session=session,packages=pkgs_list,replace=True,is_permanent=True,stage_location='@autogluon_expense_forecast_udfs')
def test_autogluon_fn(input_variable_list: list) -> float:
    import sys, os
    import pandas as pd
    from joblib import load
    import requests
    import tqdm
    import psutil
    import boto3
    import networkx
    import xgboost

    import snowpark_whl_loader

    IMPORT_DIRECTORY_NAME = "snowflake_import_directory"
    import_dir = sys._xoptions[IMPORT_DIRECTORY_NAME]

    location_of_ag_install = snowpark_whl_loader.install_autogluon()

    ag_model_name = "autogluon_model_insurance_expense"

    model_unzip_path = "/tmp/"

    model_path_unzip = model_unzip_path + ag_model_name + ".zip"

    snowpark_whl_loader.load( "autogluon_model_insurance_expense.zip" )

    from autogluon.tabular import TabularDataset, TabularPredictor

    ag_tab_predictor = TabularPredictor.load( model_path_unzip + "/autogluon_model_insurance_expense" )


    input_features = ['AGE', 'BMI', 'CHILDREN', 'SMOKER_NUM', 'REGION', 'SEX' ]

    df = pd.DataFrame([input_variable_list], columns=input_features)
    AG_DemoDataset = TabularDataset( df )

    predict_output = ag_tab_predictor.predict( AG_DemoDataset )


    return predict_output
This code will load our dependencies from the stage and then reference the TabularPredictor class, loading the model that was unzipped in the local instance as well.
The UDF will then take the incoming list of variables passed to the UDF function signature and create a Pandas dataframe, which is then wrapped as a TabularDataset for usage with AutoGluon.
From there we can get the regression output from our model, and pass that float result back from the function to the calling code (SQL or Snowpark Python API).
Testing the Snowpark Python UDF
To test this Python UDF once its installed on Snowflake we can use the Snowpark Python API and create a local dataframe to use as input to the remote Python UDF, as shown below:
input_features = ['AGE', 'BMI', 'CHILDREN', 'SMOKER_NUM', 'REGION', 'SEX' ]
input_variable_list = [19, 27.9, 0, 1, "southwest", "female" ]

model_inference_input_df = session.create_dataframe([input_variable_list],
                                    schema=input_features)

df_inference_snowpark = model_inference_input_df.select(
    'AGE', 'BMI', 'CHILDREN', 'SMOKER_NUM', 'REGION', 'SEX' ,
    call_udf("test_autogluon_fn",
    array_construct(col("AGE"), col("BMI"), col("CHILDREN"), col("SMOKER_NUM"), col("REGION"), col("SEX"))).as_("AUTO_GLUON_TEST"))
The result of this operation should be a floating point number from the output of the UDF AutoGluon model inference.
Is Data Engineering, Data Science, and Python on Snowflake Interesting to Your Organization?
Would you like to have your team work through a series of learning units similar to this article with hands on jupyter notebooks?
Reach out and say hello — we offer workshops for topics such as “how to get AutoML working on Snowflake” and other topics in Data Engineering and Data Science.
Summary
In this blog post we explained the basics of using external Python dependencies with Python UDFs on Snowflake.
We also further showed you how to integrate AutoML with AutoGluon on Snowflake via the Snowpark Python API.
For more similar articles, check out our blog index in the toolbar at the top.